Can We Build Serverless React App Using Aws S3
Creating Serverless React Apps on AWS
![]()

If you've been a part of the development community for the last few years, you're probably sick of hearing the word serverless. Or, you're obsessed with the concept and you want to make everything serverless. If you're in the first camp, you might also be asking yourself, "WTF does serverless even mean? How can I run things without a server?". I'm proud of you for asking that, and the answer is simple.
Serverless doesn't really mean without a server, it really just means not your server. It's a way to deploy applications onto cloud architecture that doesn't involve you managing servers in any way. If you're still confused, you're not alone. We're still in a slow transition period where many developers are bucking against the notion of learning something new.
I don't think that everything should be serverlesss. But, in many cases, switching to serverless architecture will save you time, money, and many headaches. Now that we know the what and why, let's look at the how.
Staging the application
Because we're living in the future, let's use the built-in CRA tool to bootstrap a new React application. Run this command:
npx create-react-app basicapp You should now have a very basic, and aptly named, application. The next thing we need to do is setup the aws cli tool, if you don't already have it. It should go without saying that you'll need an AWS account if you don't already have one.
If you're using Ubuntu, you can update apt and then run the following:
sudo apt-get install awscli The easy way to get it on OSX is through pip:
pip install awscli With either of these methods, you still might not get the most up-to-date version of the tool, depending on your OS version, your version of pip, etc…To install the latest version from source (v2 at the time of writing), run the following in your terminal:
          curl "https://awscli.amazonaws.com/awscli-exe-linux-x86_64.zip" -o "awscliv2.zip"
unzip awscliv2.zip
sudo ./aws/install
You can change the filename after -o to anything you want. This will download the latest source code, unzip the file, and then run the installer. To verify that everything is in working order, simply run:
aws --version
or
which aws
If you get something like 'command not found', or nothing at all, you might try closing out and restarting your terminal or running bash --login before getting too deep down the troubleshooting rabbit hole.
The AWS magic
Now it's time to visit the ol' console and do some clicking around. We'll need to create a new s3 bucket, and then set it up as a static web host. There are a couple of small things we'll have to tweak to make it React compatible, but we'll get to that in a minute. I'll also post the awscli commands you could run instead using the console after each step (in case you're one those people).
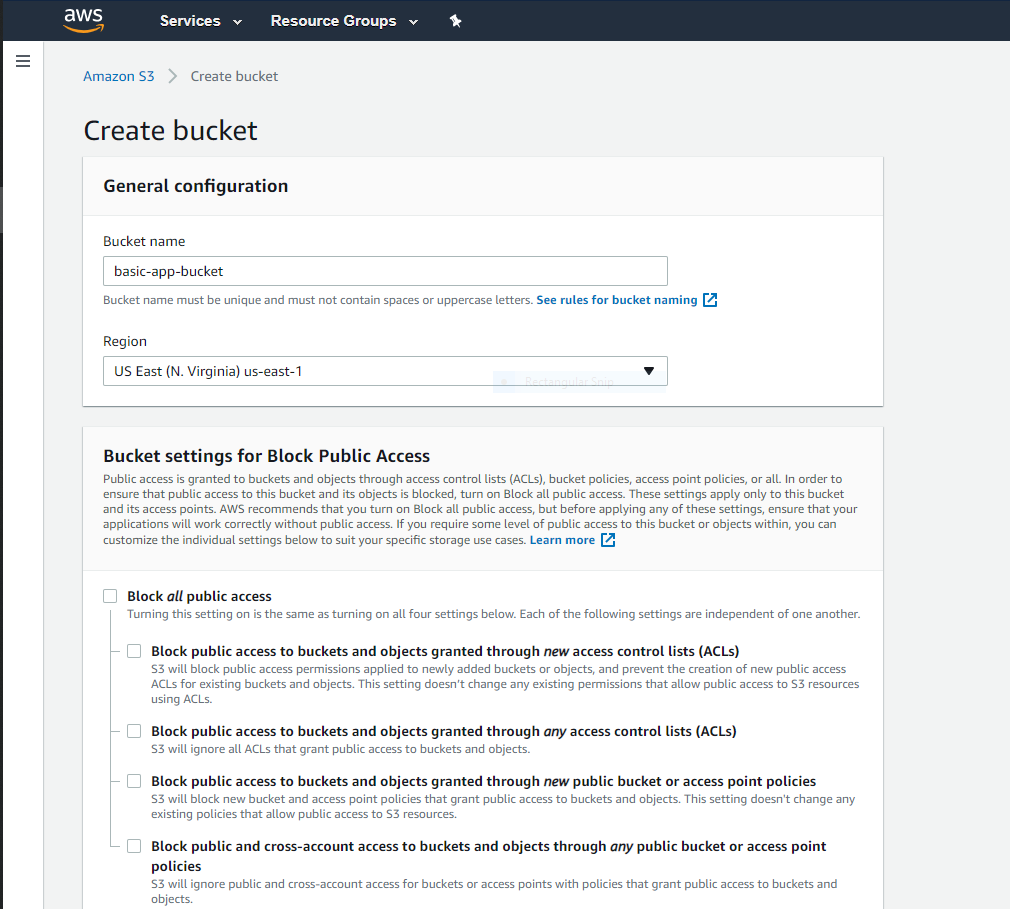
First off, let's create the bucket:

Make sure that you uncheck the 'Block all public access' box, and that everything is cleared. You might cringe at the thought, but this is actually what AWS recommends. You can read more about recommended bucket policy for static websites here.
To create a new bucket on the command line:
aws s3api create-bucket --bucket basic-app-bucket --region us-east-1 This creates the bucket 'basic-app-bucket' in the us-east-1 region, and nothing else really. Next up is changing the bucket into a static host. AWS has made this incredibly easy to do through the console (and cli), it's really just a matter of a few clicks.
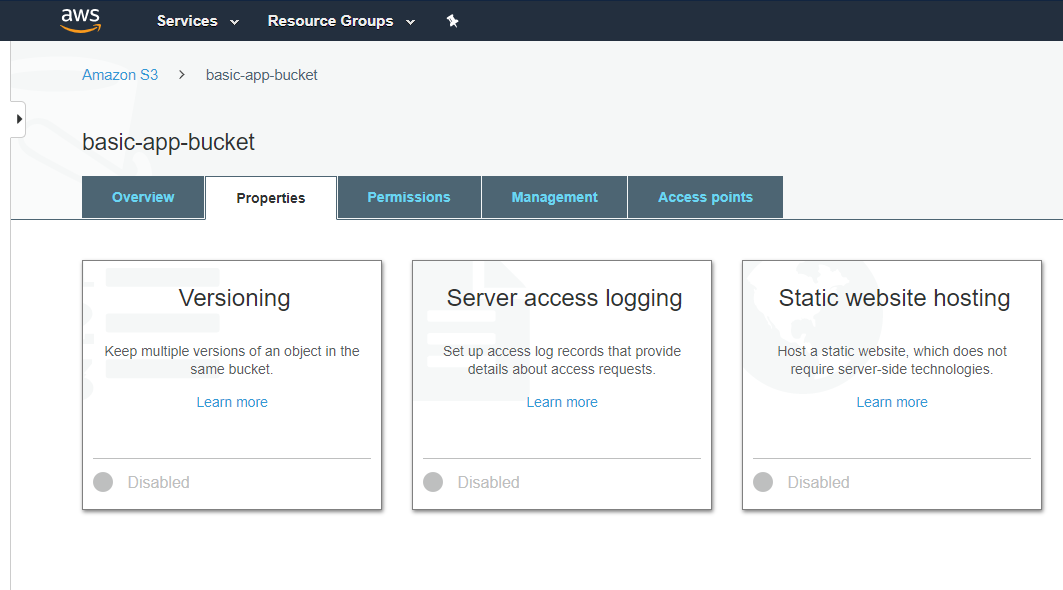
First, click on the name of your bucket in your bucket list (tee-hee). After your bucket is pulled up, click on the Properties tab to get a view something like this:

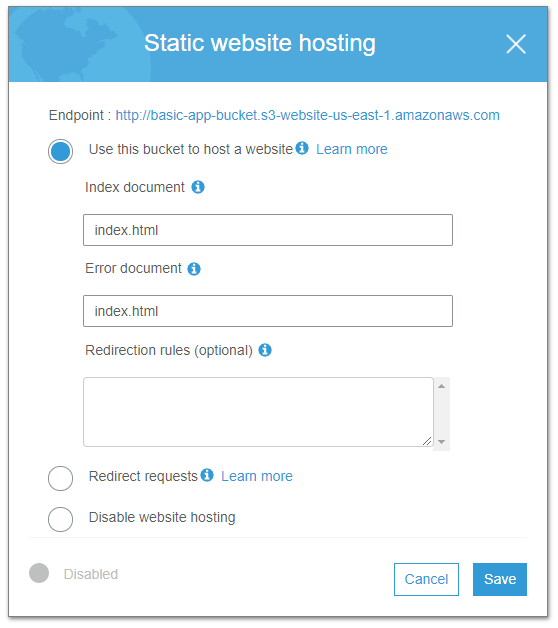
Next, click on Static Website Hosting, and let's set the options like so:

Now, for other types of websites not built in React, the error document wouldn't be the same file as the index document. But, being a super special unicorn snowflake, React needs this for routing purposes. Really, it's because the index.html file is the reference point for all of the packaged up, minified Javascript and static assets of your application after you build it. That's all the AWS, and bad explanations, we need for now.
Oh yeah, here's how you switch a bucket to static hosting with awscli:
aws s3 website s3://basic-app-bucket/ --index-document index.html --error-document index.html Pushing your app to the cloud
The only thing left to do now is make it live. The easiest way to accomplish this is to build your project, npm run build , and then copy the build contents to S3. Since React supports custom script directives in package.json, let's create a special deploy script that will make our lives much, much easier.
Open up package.json and add the following line to the 'scripts' section:
"deploy": "aws s3 sync build/ s3://basic-app-bucket", This will add a new npm run directive that we can use to easily deploy the contents of our build folder to the S3 bucket we've designated. If you decide to reuse this code for new projects, just make sure you change the bucket name to avoid disaster.
So, now we can build and deploy our app to S3 with the following command:
npm run build && npm run deploy …and the magical awscli will push all of your amazing application code to the cloud, inside of the bucket we created earlier. How's that for easy deployment? To view your website, you just need to navigate to the endpoint we saw earlier in the S3 config screen (don't bother using mine, it'll be gone before you read this):

You should be seeing your beautiful application running at this address. If not, check that you've set the bucket access policy correctly, and that the contents of your build folder actually made it into the bucket. Also, make sure you've set the index and error documents correctly.
Next steps
Since this tutorial is all about deploying to S3 with React and awscli, I won't go into the process of setting up a custom domain and all of that. To set you on the right path, though, you'll have to create a CloudFront distro and a new certificate in Certificate manager. Then, you'll create a CNAME alias in Route-53 to point to your CloudFront distro. That's it, that's all I'm saying.
I Hope this tutorial helped, now go build something amazing and give me all of the credit!
Can We Build Serverless React App Using Aws S3
Source: https://levelup.gitconnected.com/creating-serverless-react-apps-on-aws-bd038ce76a81
Posted by: banksyessist.blogspot.com

0 Response to "Can We Build Serverless React App Using Aws S3"
Post a Comment